|
HOME STUDIO
OK. So, a lot of us voice artists and audiobook narrators just want a way to record our auditions or audiobooks and not worry about that complicated tech stuff. Am I right? Well, in this day and age where a great portion of recording voice over auditions, audiobook production, podcasts and even actual broadcast spots is done in and from our home studios, we now require a better than average knowledge and basic understanding of the tools of audio engineering. And what goes into achieving a good and decent sounding recording. I already covered a lot of the basics in another article: What You Need to Start an Audiobook Narration Career – Your Space. Equipment. DAW. Headphones. Computer. But what happens when you, in actuality, get ready to record something and edit it?
YOUR DAW DETERMINES First: Understand that whatever DAW (software) you choose for recording and whatever computer platform (Mac OS, Windows, Linux) on which you choose to record, no combination of the two sound any better than any other. It’s all binary 1’s and 0’s. (That’s the digital in Digital Audio Workstation.) The differences are in:
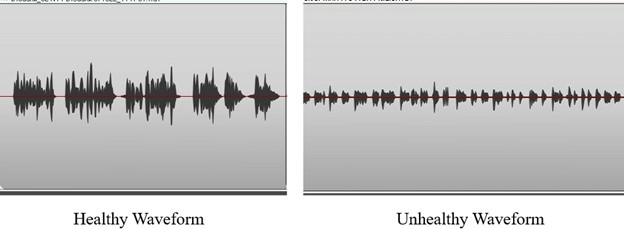
DAWs & DEFAULTS Unless otherwise set, almost all of the popular DAWs used for VO and audiobooks record to a .wav sound file format on input. Some have associated visual files that represent the actual waveform that appears on a track. These .wav files should not be equated to or conflated with the exported/rendered deliverable .wav files that you would send to a client. Each DAW also has its own proprietary project file extension. (.aup3 for Audacity – .rpp for REAPER – .song for Studio One – .ptx for ProTools – .twproj for Twisted Wave.) These are placeholders that allow each DAW access to the files it needs to populate the track or tracks of a project. And these project files are not interchangeable. (For instance: ProTools wouldn’t know what to do and offer an Error message if you asked it to access an Audacity .aup3 project file, and vice versa.) But exported/rendered files (.wav - .flac - .mp3 - .aiff) can be swapped between one DAW to another DAW. RECORDING ON INPUT Ideally, your Input Recording Level (which is set on your interface) should be set to record to between -12dB to -6dB Peak. Meaning that you should be recording hot enough to create what I call a “healthy” looking waveform. One that takes up approximately 1/3rd the height of the track. But not too hot (or too low) as not to leave enough headroom to accommodate any further mastering FX processing. And certainly not above 0.0dB, which is clipping or digital distortion. (Occasionally going over -6dB Peak is fine. But only occasionally. Exceptions may be for animation or video games. Even with those, it is still a good practice to be recording below peak distortion levels on input.)
The mastering possibilities from here depend upon what your client, agent or casting director requires. FIRST, NORMALIZE AUDITIONS OK. So, you have recorded that 15- or 30- or 45- or 60-second spot copy for a commercial audition. You’ve edited it to your liking and hopefully kept it within that allotted time frame. And, c’mon, you really nailed it! They’ve asked for either a RAW (unprocessed) .wav or .mp3. Now what? Well, for commercial auditions, you will probably Normalize. Some audio engineers suggest Normalizing up to -3dB Peak. Some suggest Normalizing up to -1dB Peak. Whichever, the theory is that louder is perceived as better. In that range (between -3dB and -1dB) there isn’t much perceivable difference by the average listener. But there will definitely be a perceivable difference between your file (at, say, -9dB Peak) and almost everyone else’s who has Normalized their files up to that -3dB to -1dB Peak range. So, you Normalize. USE NOISE REDUCTION? But now you start to hear some other stuff in your previously perfect sounding recording. Noise! Rumble! Hiss! Static! Hum! Now what? Well, frankly, that noise or rumble was always there in your recording. It just became more prominent when you bumped up the volume by Normalizing the recording. The microphone is like the camera. It doesn't lie. Mics hear and see everything! So, what to do? Most DAWs have some native basic and common processing plugins – or FX. Some may have a Noise Reduction (NR) plugin, which may entail a two-step process of capturing a noise profile from your recording – usually from a small selection of room tone that does not include any of your vocal frequencies – then applying it to the recording. The NR plugin attempts to filter out that captured noise while leaving your voice alone. However, not all NR plugins are the same (or even very good), and if used too aggressively, NR may damage the audio – most of the time making you sound like you’re talking through a metal tube. I would only recommend NR for extreme cases or as a last resort. ... OR HIGH PASS (HP) FILTER EQ However, applying a High Pass (HP) Filter EQ may well be enough to reduce or even eliminate some low frequency noise or rumble that is present in the recording that lies well below your natural vocal frequencies. This practice is also relatively transparent – meaning that the average listener won’t be able to discern that you did any processing to the recording. It will just be cleaner and brighter. Where to set the cut-off frequency and how steep a slope (roll off) to use depends upon your voice, and how quickly (and how much) of those low frequencies you desire to lessen or eliminate. Some voice artists may also wish to include a Low Pass (LP) Filter EQ to lessen some hiss or static or screechiness in the upper frequencies – say, at above 16kHz or so – which is also above most people’s vocal frequencies and hearing. Again, pretty transparent and undetectable. So, Normalization. Then NR and an HP-LP EQ are the first steps to perform on your voice over auditions before submitting it to your client, agent or casting person. See Part 2: More useful and transparent processing FX to consider, and what additional FX will be needed to meet audiobook production specifications. Email: jamesromick@msn.com ALSO SEE THESE HELPFUL VOICE OVER HOME STUDIO RECORDING ARTICLES |
sign up for our


Tell Us What YOU Think!
Please Note: Since we check for spam, there will be a slight delay in the actual posting of your comment.
Comments
No comments have been posted yet. Hurry, and you could be the first!


.png)


As of the NEW website launch, 03/22/2012
click for new article alerts