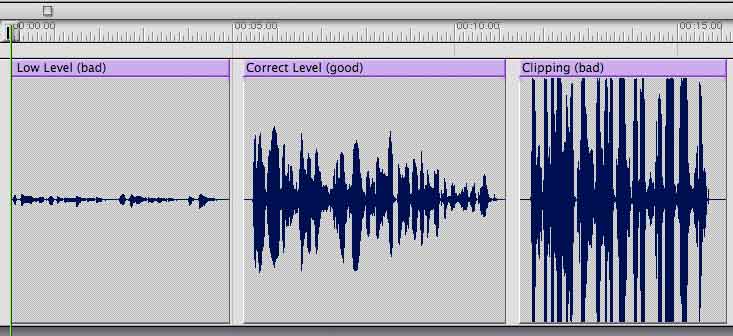
 After eliminating outside noise, record tests. Is the level too low
(left panel above)? Make adjustments until you get a good fat signal
(middle panel) that doesn’t clip (right panel).
Part 2
Soundproofing Your Studio
From Noise Of Everyday Life
By William Williams
Voice Actor & Coach Aliso Creek Productions
 In Part 1 of this series on soundproofing a home studio, we located any phantom hums and buzzes that might sneak into your voice over recording, and we sent those puppies packing. In Part 1 of this series on soundproofing a home studio, we located any phantom hums and buzzes that might sneak into your voice over recording, and we sent those puppies packing. Now let’s deal with those sounds of everyday life.
We can divide these into outside sounds - including inside sounds from other parts of your residence, like your kids playing Guitar Hero in their bedroom, and sounds in your immediate work area.
So we must keep the outside sounds out.
WHERE TO PUT STUDIO?
If you have the option, select the quietest room in the house to record in. For instance:
So start by picking the quietest space that you can.
PREPARING THAT ROOM
Now let’s work on that room you’ve selected.
There’s an old adage in acoustics that says soundproof is air proof. If air can sneak into your room so can sound.
So first, shut all the windows and the door to your room (duh!). Ahhh, much better.
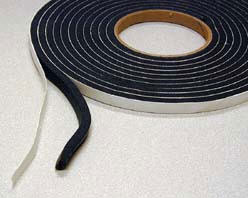
Now check those windows. Are they drafty? If so, weatherstrip them with foam weather stripping. If you live in a noisy environment you could consider:
BAFFLING JOB
If you're handy, you can make the baffle from a 1/2-inch plywood or particle board rectangle that's large enough to cover a few inches past the edge of the window.
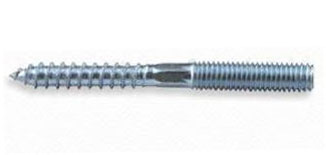
 Weatherstrip the panel where it mates against the wall or window frame and secure the whole thing in several places with hanger bolts (pictured) and wing nuts. Weatherstrip the panel where it mates against the wall or window frame and secure the whole thing in several places with hanger bolts (pictured) and wing nuts.It's similar to what folks who live in hurricane country put up, except it's on the INSIDE not the OUTSIDE!
Paint the plywood a light cheery color so you don't feel like you're doing hard time in solitary.
This should block out all but the most stubborn sounds. See? There’s a reason most recording studios don’t have windows.
LEAKY DOOR, TOO
 Use the same reasoning to check the door. Use the same reasoning to check the door. Use foam weather stripping around the sides and top. And then use something to block the crack on the bottom of the door - a two-by-four wrapped with a fluffy towel usually works.
And tell Aunt Gladys to turn the TV down!
YOUR QUIET PLACE ...?
So now you’re alone with your thoughts in your quiet place.
Where were we? Oh yes, our quiet place. Hey! It’s not so quiet after all. There are all kinds of little sounds. Listen for:
TEST A RECORDING
OK, let’s fire up that mic and computer and record a voice-over. Reading an ad from a magazine will do.
First record about 20 seconds of silence. Then record the ad.
Get close enough to the mic (4 to 8 inches) and speak loud enough to get a good signal. You don’t have to scream - unless it’s a drag race commercial - just talk with confidence.
Remember that your voice is the “signal” part of that “signal to noise ratio.” So it should be a good solid sound.
PLAY IT BACK
Now play back your recording. It’s best to listen with headphones so that real noise in the room doesn’t mask your ability to hear any recorded noise.
Listen to the “silence” first. Is it really silent? Or do you hear extraneous noises?
If you do, you need to identify their source and figure out how to eliminate them.
Most recording software lets you look at your recorded voice. Does it fill up the waveform without clipping? Or is it wallowing down there in mud with the noise?
Adjust the mic gain (if possible), your distance from the mic, and the loudness of your speech until you get a good, fat signal that doesn’t clip.
NEXT: SOUND TREATMENT
So now we’ve covered soundproofing your workspace. Next we need to look at sound treatment.
The two major sounds you’re likely to hear on your recording - besides your sonorous or sultry voice - are computer noise and room echo. In Part 3 we start dealing with these.
ABOUT WILLIAM ...
William Williams is a voice over talent with national, regional and local credits. He has also been a voice over coach in Los Angeles for 15 years where he teaches regular classes, does private coaching, and produces voice over demos at Aliso Creek Productions, in Burbank. He also offers online voice-over classes and coaching.
Email: new_leads@alisocreek.net
Online voice-over classes: http://onlinevoiceoverclasses.com
... Low Prices ... Speedy Delivery!
|
Tell Us What YOU Think!
Please Note: Since we check for spam, there will be a slight delay in the actual posting of your comment.
Comments
No comments have been posted yet. Hurry, and you could be the first!


.png)


click for new article alerts